一、自定义索引名称
1. 修改filebeat配置文件
vim /etc/filebeat/filebeat.yml
#在Elasticsearch Output栏下添加3行内容!(注意缩进格式!!!)

#1. 131行下面,定义索引名称和索引样式,自己随便起,能区分开就行!
# 这两行顶头开始写!
setup.template.name: "10.0.8.5"
setup.template.pattern: "10.0.8.5-"

#2. 添加134行,索引生命周期管理ilm功能默认开启,开启的情况下索引名称只能为filebeat-*
# 这1行顶头开始写!
setup.ilm.enabled: false

#3. 137行下面,添加刚才定义的索引
# 这一行开头2个空格!
  index: "10.0.8.5-syslog-chupeng_%{+yyyy.MM.dd}"
127 # ================================== Outputs ===================================
128
129 # Configure what output to use when sending the data collected by the beat.
130
131 # ---------------------------- Elasticsearch Output ----------------------------
132 setup.template.name: "10.0.8.5"
133 setup.template.pattern: "10.0.8.5-"
134 setup.ilm.enabled: false
135 output.elasticsearch:
136   # Array of hosts to connect to.
137   hosts: ["10.0.8.5:9200"]
138   index: "10.0.8.5-syslog-chupeng_%{+yyyy.MM.dd}"
139   # Protocol - either `http` (default) or `https`.
140   #protocol: "https"
141
142   # Authentication credentials - either API key or username/password.
143   #api_key: "id:api_key"
144   #username: "elastic"
145   #password: "changeme"
2. 重启filebeat
systemctl restart filebeat
3. 查看日志,检查filebeat重启是否成功
tail -f /var/log/chup.log
4. 查看当前elasticsearch的索引
curl 127.0.0.1:9200/_cat/indices
root@4c16g:/etc/filebeat# curl 127.0.0.1:9200/_cat/indices
green  open .geoip_databases                  vp77wdCxR6ersomYKR7XIg 1 0    44    0  40.8mb  40.8mb
yellow open filebeat-7.16.2-2021.12.31-000001 T2pz3T1STzed5845y95pFA 1 1 12846    0   3.6mb   3.6mb #这一行是现在的
green  open .apm-custom-link                  NwEzmXWMRb-Lnnw_Y8C33Q 1 0     0    0    226b    226b
green  open .kibana_task_manager_7.16.2_001   1n0PxyQoSJKKmUs20b79qA 1 0    17 5625 724.3kb 724.3kb
green  open .kibana_7.16.2_001                LCun_7ggQiekuppoURCj8w 1 0   254   30   2.4mb   2.4mb
green  open .apm-agent-configuration          kQzGyZJxSSaotJkeBbpVbQ 1 0     0    0    226b    226b
green  open .async-search                     9RuXcU90T1OMOX-AZ6YDZA 1 0     0    0    249b    249b
5. 删除原来的filebeat索引
curl -XDELETE 127.0.0.1:9200/filebeat*
root@4c16g:/etc/filebeat# curl -XDELETE 127.0.0.1:9200/filebeat*
{"acknowledged":true}root@4c16g:/etc/filebeat#
root@4c16g:/etc/filebeat# curl 127.0.0.1:9200/_cat/indices
green open .geoip_databases                vp77wdCxR6ersomYKR7XIg 1 0  44    0  40.8mb  40.8mb
green open .kibana_task_manager_7.16.2_001 1n0PxyQoSJKKmUs20b79qA 1 0  17 5646 735.9kb 735.9kb
green open .apm-custom-link                NwEzmXWMRb-Lnnw_Y8C33Q 1 0   0    0    226b    226b
green open .kibana_7.16.2_001              LCun_7ggQiekuppoURCj8w 1 0 254   30   2.4mb   2.4mb
green open .apm-agent-configuration        kQzGyZJxSSaotJkeBbpVbQ 1 0   0    0    226b    226b
green open .async-search                   9RuXcU90T1OMOX-AZ6YDZA 1 0   0    0    249b    249b
6. 再次查看索引
#1.模拟ssh登录,产生日志
ssh root@42.192.132.182 #密码随便填,模拟登录失败

#2.查看索引
curl 127.0.0.1:9200/_cat/indices
root@4c16g:/etc/filebeat# curl 127.0.0.1:9200/_cat/indices
green  open .geoip_databases                   vp77wdCxR6ersomYKR7XIg 1 0  44    0  40.8mb  40.8mb
yellow open 10.0.8.5-syslog-chupeng_2021.12.31 FTqhnt5iRx2zUwM5tKzg5A 1 1   3    0  26.8kb  26.8kb  # 按自己设置的名称产生了日志索引!!!
green  open .apm-custom-link                   NwEzmXWMRb-Lnnw_Y8C33Q 1 0   0    0    226b    226b
green  open .kibana_task_manager_7.16.2_001    1n0PxyQoSJKKmUs20b79qA 1 0  17 5976 717.4kb 717.4kb
green  open .kibana_7.16.2_001                 LCun_7ggQiekuppoURCj8w 1 0 254   31   2.4mb   2.4mb
green  open .apm-agent-configuration           kQzGyZJxSSaotJkeBbpVbQ 1 0   0    0    226b    226b
green  open .async-search                      9RuXcU90T1OMOX-AZ6YDZA 1 0   0    0    249b    249b
二、kibana重新添加索引
7. 删除原来的索引
# 由于索引改名了,所以需要重新添加索引!
# 10.0.8.5:5601
# 找到左侧失效的索引,点击其后面的“···”,
# 然后选择第二项,打开管理索引页
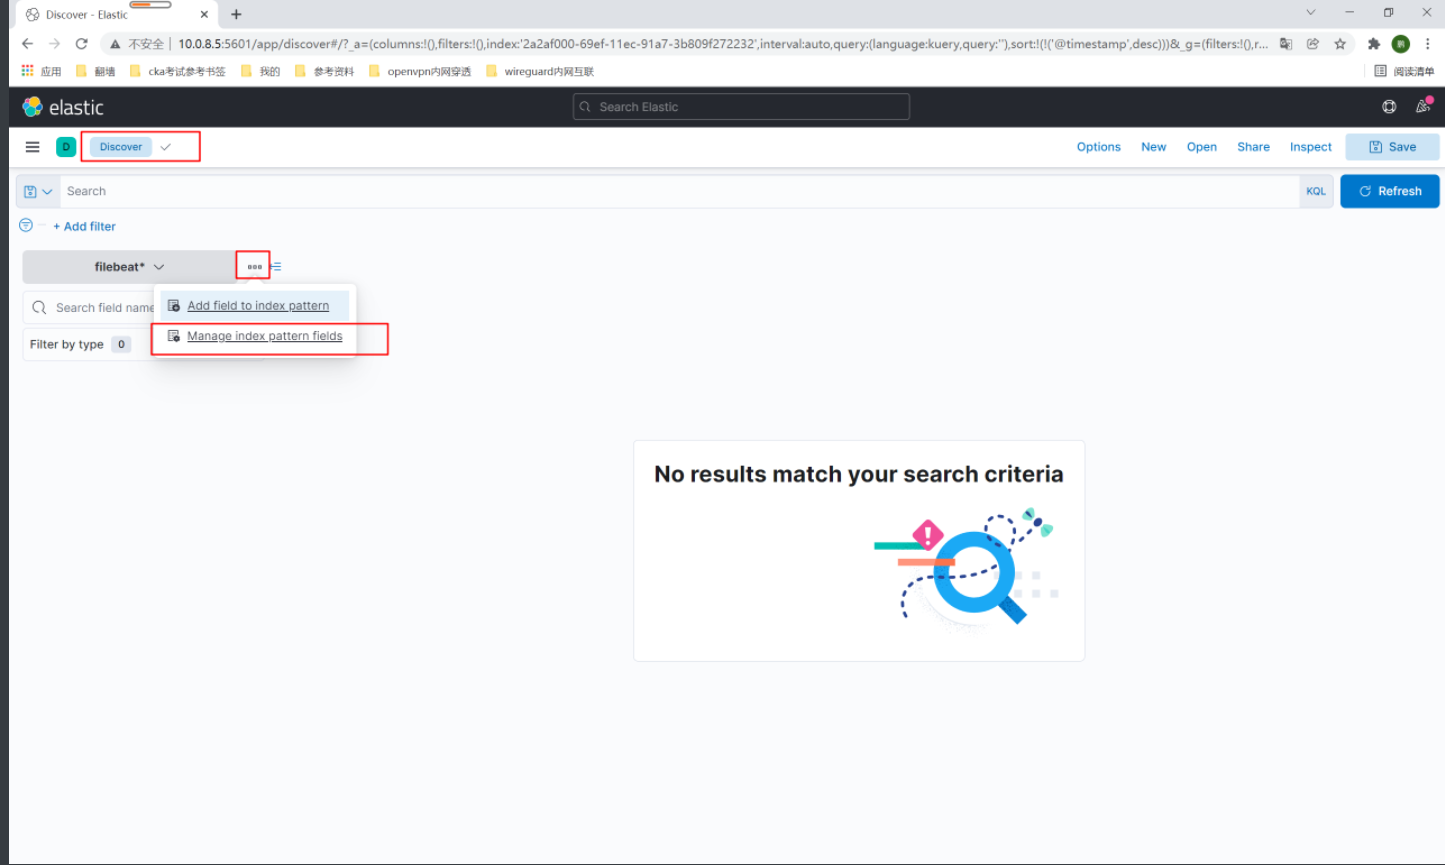
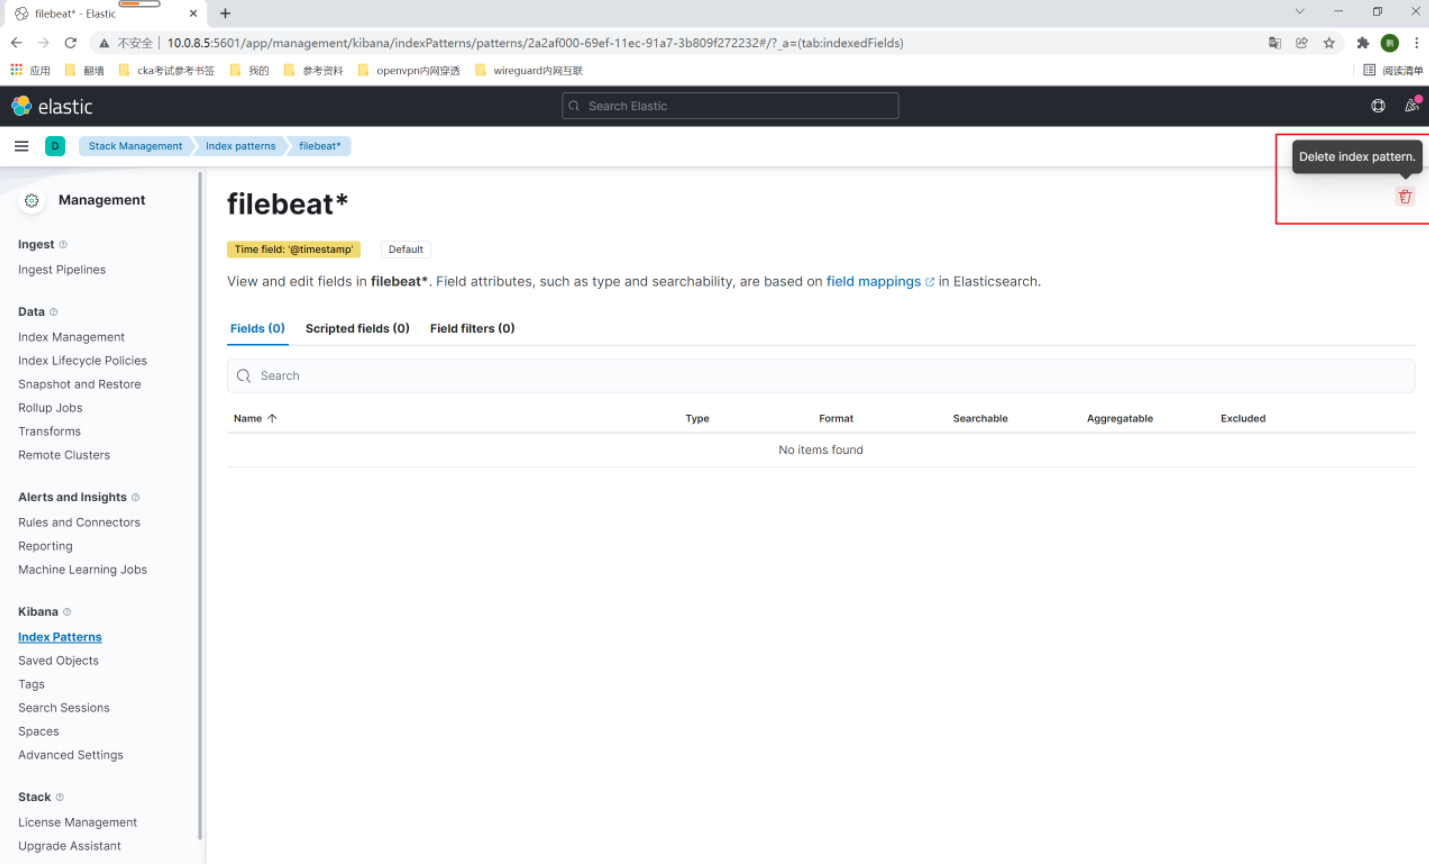
# 新弹出的页面,点击右上角的删除即可!
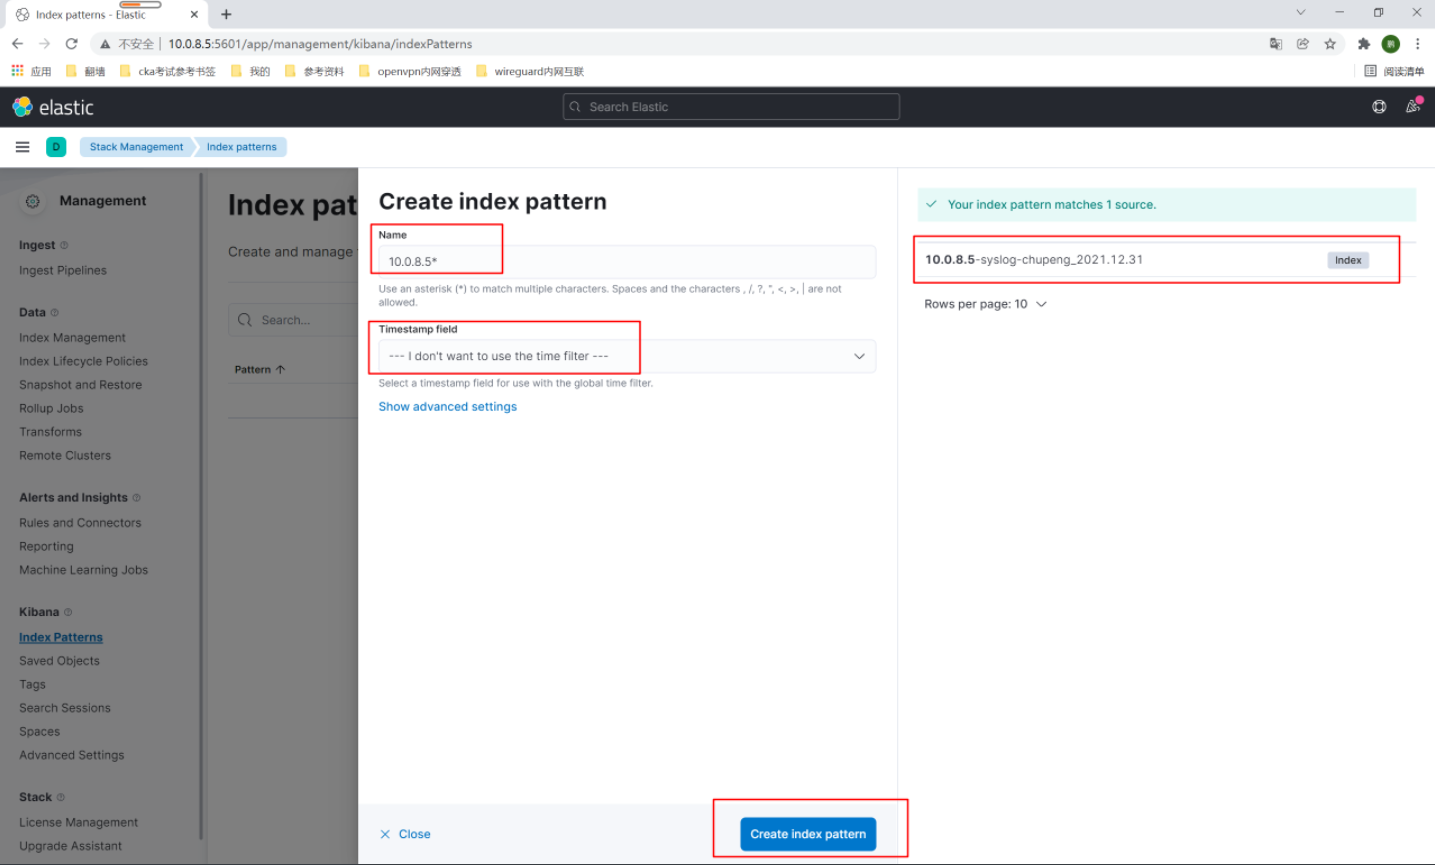
8. 重新添加索引
# 点击创建索引,在右侧能显示出目前的索引!
# name:10.0.8.5*
# timestamp:选择不使用时间戳!
# 点击下面的创建!
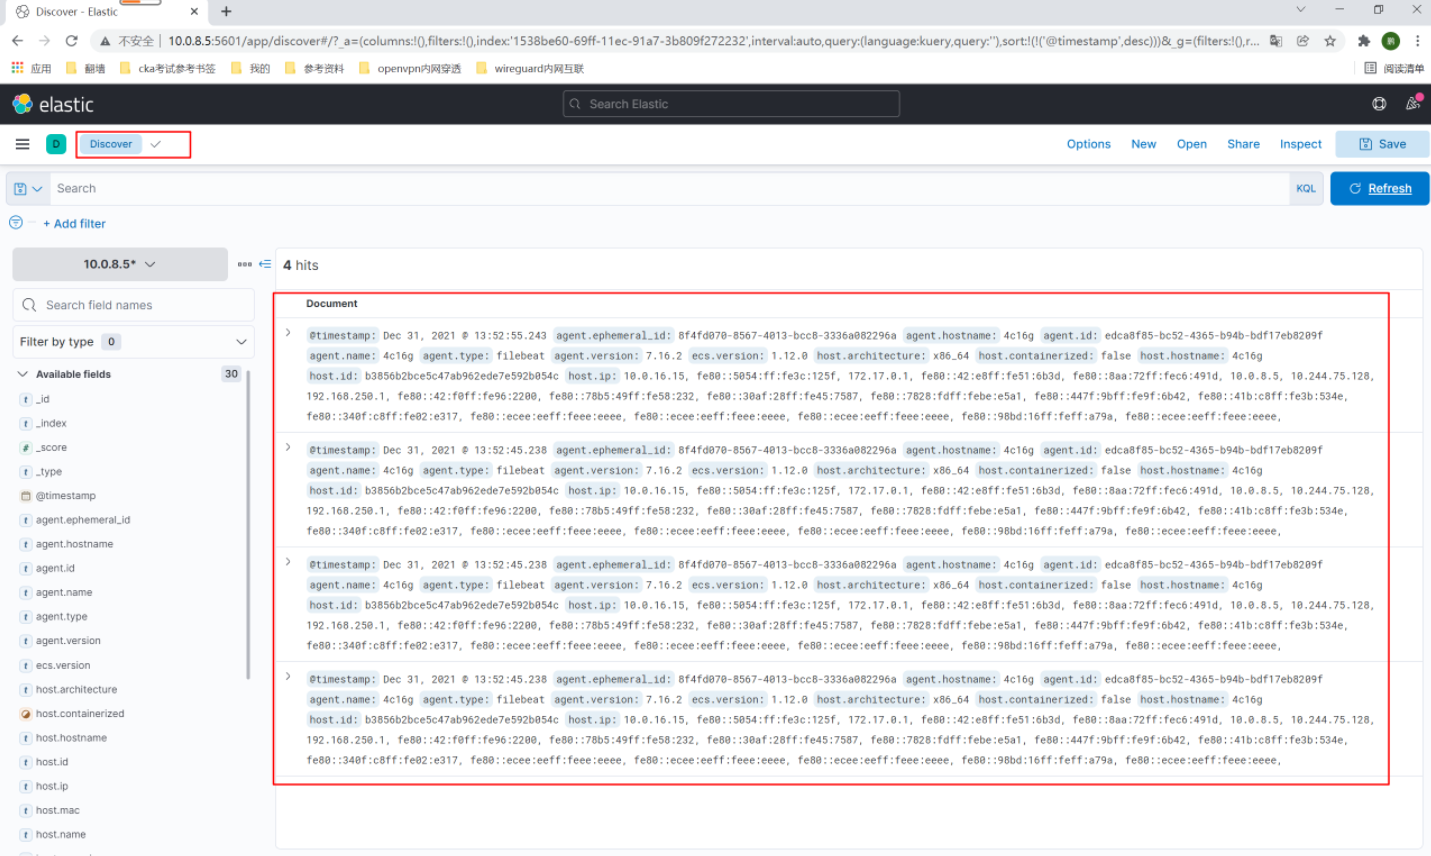
# 再次点击discover,即可查看到日志了!
最后更新:
2022-02-19 13:05:46